In the last few years, embroidery has regained its popularity. Because of this, many famous brands started to produce embroidery machines for both home and business use. But what happens when you can’t afford an embroidery machine?
Well, you can start doing the embroidery by hand, but it is not the simplest thing to do (this is why hand-made embroidery is so expensive) or you can learn to do it using your sewing machine – and this is exactly what I am going to teach you today.
Table of Contents
What is an Embroidery

Before moving to the actual technique, I want to make sure that you truly know the meaning of the word embroidery.
Embroidery is the art of decorating a piece of cloth by applying a thread or yarn with the help of a needle. Embroidery may also include other elements such as gems, beads or feathers.
Due to the easiness that can be made, we can see embroidery designs on almost anything – denim, blankets, curtains, shorts and so on.
Good. Now you are aware that you are on the right article and you can read further without realizing later on that you didn’t need this information and you’ve lost time on something that you don’t care about.
Steps You Need to Take Besides the actual Embroidery Process
It is clearly the first time you are making embroidery using your regular sewing machine or you wouldn’t be here and that makes you a beginner. So, let’s see what are the prequel actions you need to do before starting and also while you sew your design.
Don’t Panic
Being agitated when starting a new craft is expected, particularly when it concerns using a piece of machinery, but that doesn’t mean that you should start thinking it is impossible. The worst thing that could happen is to make a mess, but I will teach you how to correct that mess. Or you can keep your first result as a reminder of the moment when you started.
So please, whatever you do, don’t panic! You will make embroidery and not brain surgery.
Acknowledge The Fact That You are a Beginner
Nobody was born with any kind of knowledge, so you need to understand that you are at an entry-level point and you need to learn and practice in order to succeed. Don’t think that if you worked an hour one day, you are ready to create a masterpiece, because you won’t.
You have to struggle to become better and there is no other way than practice.
Don’t Start With a Big Project
The worst thing you can do is to start with a project that is for advanced users. It will most probably turn out bad and it will discourage yourself. Start with an easy and small model and grow from there organically as you master the technique.
Keep a Journal
Remember when you were at school and you had to take notes for an easier understanding of the class? The same thing applies here.
So, start a journal and write down what kind of fabrics you worked on, what kind of thread you’ve used and so on. Write down any success but also all failures. Read it all at the end of the week and see your progress.
Test Your Stitch
Before you start the actual embroidery design, you should test the stitch. I recommend you to do this regardless of your experience because every thread, fabric, and needle work differently. You want to be 100% sure that you know all the parameter before commencing the embroidery process.
Buy All the Supplies you Need
Before starting the actual tutorial, let’s see what are the supplies you need to make an embroidery with a regular sewing machine:
- A sewing machine (of course);
- Have a design in mind;
- A fabric marker pen to trace the design;
- A piece of fabric. I recommend you to try and use a stiff material and don’t go and use a good piece of clothing from the beginning;
- An embroidery needle;
- A thread of your choosing. Use an embroidery thread because it will not only look fabulous on the completed garment but it will also give strength to the garment. However, you can use other threads as well. I recommend you to go with either cotton or polyester, but only if can’t find rayon. Pick the threading after the cloth you are going to use. You need contrasting colors;
- A stabilizer. You will need it for shifting the design and obtaining some delicate stitches. I recommend you to use a water-soluble stabilizer because at the end of the process you can wash it out. Also, it won’t damage the stitches as the tear-away stabilizers that need to be pulled away;
- A glue stick that will help you to secure the stabilizer on your work area in a gentle way;
- An embroidery hoop;
- A scissor;
- A foot. You can pick multiple ones, but I suggest you work with the clear applique foot, a free motion embroidery foot, a darning foot and a straight stitch foot.
The Actual Steps of Doing Embroidery with a Regular Sewing Machine
You have everything ready, so all there is left now is to actually start working. Read further to find out the technique of creating embroidery with a regular sewing machine.
Step 1
Lower the feed dogs, meaning the metal gears that are holding the fabric in place. I recommend you to use the instruction manual to do this procedure correctly. Some sewing machines come with a distinctive darning plate to encase the feed dogs.
This procedure is required because it will give you free movement while sewing. By doing so you will be in total control of the sewing machine.
Step 2
Prepare your thread. You can use any thread in the bobbin, but I advise you to begin with a full one. However, when working with a thread for bobbins, always work with a fully twisted bobbin thread for embroidery. This way you will reduce the possibility to find the bobbin empty in the middle of your project.
Step 3
Lift the presser foot and attach a darning foot. This is an optional step, but I think that you should take it because it will allow you to create an opening that will give a better view of your embroidery area.
However, if you decide not to use a darning foot, then just remove the presser foot and create the stitches without any foot.
Step 4
Change the needle to an embroidery one. Its size can vary and it is given by the type of fabric you are working with. Thread the sewing machine’s needle but also its bobbin with a sewing machine embroidery thread.
Step 5
Decrease the top tension of your sewing machine. This is done differently from a sewing machine from another. The reason for this is to guarantee that the bobbin string is not noticeable on the right part of the material.
Step 6
Use the stabilizer. As I said earlier, there are various types of stabilizers. You need to use one especially if you are working with slippery or thin materials because they tend to gather when embroidered.
Cut a section of stabilizer that is the equivalent size as the area you want to embroider. This will stop the material from shifting as you stitch.
The correct way to do is to place the material on the top of the stabilizer.
Step 7
Use the fabric marker pen to add your chosen design on the fabric.
If I were you, I would start with block letters. They are the easiest to do. Even easier than script letters
Step 8
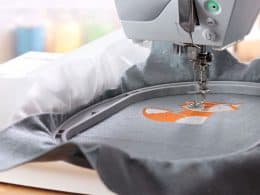
Add an embroidery hoop because simply dragging and pushing the material from side-to-side with your hand will not produce the same result. The embroidery hoop will help you to keep the fabric formed and even while the hoop will aid the process of moving the garment as it is tailored.
Step 9
If you decide to use an embroidery hoop, and I advise you to do so, release the bolt and folder the fabric between the two sections of the hoop. Place the material so that the design is centered within the hoop.
Step 10
Tighten the material and bind the screw. The material should be strained sufficiently tight that you can pat the material with your finger without the cloth falling or moving. So the reason why I recommend to use the embroidery hoop is that it presents better control while sewing.
Step 11
Put the fabric beneath the sewing machine’s needle, lining up the endpoint of the design. Secure the hoop as you sew some stitches to ensure the thread. Start gradually moving the hoop as you go, sewing as slow as feasible till you gain a feeling for the free motion method. Manage the hoop with small back-forth movements, running in circles if needed.
To paint a full picture of what I am saying, I will tell you that I use a zigzag stitch when I need to create bolder letters.
Step 12
When you finish, pull the threads on the reverse part of the fabric. Tie them together and use a scissor to trim them.
To really understand the steps, please watch the tutorial below:
What to Do If You Make a Mistake
When you work, especially when you are at the beginning level, you will make mistakes. However, you don’t need to worry. I will teach you how to remove your embroidery without damaging the cloth.
Work Your Way from the Inside Out
So, most embroidery designs are produced applying multiple layers of threads with a piece of stabilizing material located on their backs. Operating from the inside part of a piece of fabric will aid you to remove the threads without harming the fabric below.
Cut and Expel the Threads
With the help of your seam ripper, cut down the center of a small segment of the embroidery threads on the inside of the garment. Be careful to catch the stitches with the seam ripper and not the material underneath.
Twist the material right side out and work with a tweezer to carefully pick the stitches that you chopped. Repeat the process. Work gently and carefully to avoid accidents such as cutting or tearing the material beneath. To be 100% sure you don’t miss any stitch, use a magnifying glass.
Last Thread Extraction
When you manage to remove an embroidery, you may notice that small bits of thread still exist both parts of the fabric. Put a section of duct tape over the material and smoothly pull it off. When doing so, it will also take all remaining threads.
However, I strongly recommend you not to use this method on napped fabrics because you can damage them.
Cleansing Process
When doing the laundry, it will also help you to eliminate any pulled threads from the area where the design was located. After washing and ironing the piece of cloth will look as if the embroidery didn’t exist, so you can start all over and practice with a new design.
Conclusion
That’s it for today. I hope that you are now ready to try and work your way to create beautiful embroidery designs with the help of only your regular sewing machine.
Please feel free to leave a comment if you have any questions. I will be more than happy to help you as best as I can. Also, you can use the social media buttons to share the article with your friends.


