A sewing machine is a compact device, but even so, it needs periodic cleansing. You might wonder why in the world do you have to do that for. The answer cannot be simpler than this. Because you want to use it for many many years and to actually feel that you didn’t spend money on a piece of junk.
Recurrent cleaning is very crucial to give it a full-service life. I know that if you are a lady, the idea of taking apart your machine from time to time is scary, but I will teach you how to clean a sewing machine and most importantly how to do it correctly.
Table of Contents
Should I Clean My Sewing Machine Frequently?
Before going to the actual tutorial, there are some things that you need to know about this process.
Not every tailor needs to clean the sewing machine as often as others. The cleaning is dependent on a lot of factors. So let’s talk about them, but for that, I need you to ask yourself some questions and respond honestly.
How Often Do I Work on My Sewing Machine?
Just as in all cases, the maintenance of your sewing machine depends on the number of uses. Think of a T-shirt. You don’t wash it every week if you don’t wear it. The same applies in this case as well.
So, if you keep your sewing machine locked in a closed, away from dust, and use it only once a month, you won’t have to clean it more than once per year.
However, if you sew every day, of course, this process needs to be repeated more often. As a personal recommendation, you should clean it every second time when you replace the bobbin thread.
This way you will ensure that the dirt and lint won’t affect the machine.
How Am I Using My Sewing Machine?
This is also a very important factor. Depending on the type of fabrics you usually work, the cleaning numbers will also differ.
For example, if you work with materials that don’t produce too much lint, such as leather, you don’t need to clean it as often as when working doing mostly embroidery or quilting.
However, in both cases remember that lint is not your only concern. There is also dust.
Where Do I Work on My Sewing Machine?
Your workspace will influence the amount of potential dust that your sewing machine will come in contact with. If you work at home it will be very much different than if you work at a hand-maid fair outside.
Learn How to Clean a Sewing Machine by Taking These Easy Steps
Now, that you have all the necessary answers, we can move to the main topic of this article. Cleaning a sewing machine sounds more difficult than it actually is. I can promise you that after reading these indications and you will actually do it for the first time, you will realize it is as easy as a Sunday morning.
Step 1. Read the instruction manual
Before doing anything else, you should read your machine’s manual. Each sewing machine has its own characteristics and some special care should be taken into consideration.
The sewing machine’s textbook will surely have a chapter about cleaning. Read it carefully, otherwise, you could discover you opened some parts that you shouldn’t have. Your sewing machine is not a lego device so, you should not tear it down into pieces. You just want to clean and oil the parts that require this activity, especially if you own a computerized sewing machine.
If you don’t know where you’ve put the manaul, you can always find a copy online.
Step 2. Prepare your Tools
In order to clean your sewing machine, you will need some auxiliary tools such as a screwdriver to open the device, a small brush or oil. Most probably you have received these accessories when you bought the sewing machine but if you haven’t you don’t need to worry. You can always order them separately.
You should also prepare some extra cotton buds, a pair of tweezers and some soft cloths. They will help you along the way.
Step 3. Clean the exterior of the sewing machine
Before going deeper, you should remove any accessories the sewing machine might still have on it and clean its exterior. You want to do this to be sure that before you go and focus on the mechanical/computerized parts you removed all hair, dust or lint the device has on it.
Step 4. Start disassembling the sewing machine
You’ve already read the instruction manual, so you know how to do this. Take apart the components specified in the textbook, but only after you check if the sewing machine is off and also unplugged. Never do this if the device is connected to a power source.
Step 5. Clean the Needle Area
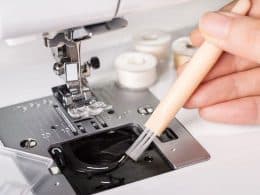
If you can, remove the needle holder. This way you will be able to access the area easier with the brush. Clean all this part and remove any pieces of lint that are there.
Also, lift the needle and the presser foot to have a better passage for your tools.
Step 6. Clean the Bobbin Area
This step can be different depending on your sewing machine’s type. It can either be a top-loading sewing machine that has a drop-in bobbin or a front-loaded sewing machine that has the bobbin case in front.
I want to be sure that you understand the process, so I will take each case at a time.
Top-loaded sewing machines
Begin by lifting the bobbin its case in order to reach the desired area. After that, remove the screws indicated in the manual so you can remove the metal plate that is around the feet teeth. By removing the metal plate you will gain access to the bobbin area.
You are at the point when you can start “killing” all dirt there – lint, hair, dust. Be sure you take out all the parts that are removable and clean them gently with a clean cloth.
Even though it might seems simpler to use a hairdryer than a cloth, don’t do it! You can harm the mechanism and destroy your sewing machine. Take your time and manually clean everything.
Front-loaded sewing machines
If you have a front-loading sewing machine, the bobbin cleaning is actually easier. Removing the bobbin and its case will grant you better access to the area.
Do the same as with the previous model and clean it gently. If you will use a brush, you will see that you can push the dirt out. However, you should be careful not to push the dirt further into the machine.
Step 7. Clean the Area from Under the Bobbin
After cleaning all the bobbin area it is time to move even further. So, remove the bobbin holder as instructed in your textbook. Clean this part exactly as you did the bobbing one.
There are some small devices that work as vacuum dust removers, but if you are at your first cleaning or you are not comfortable using them, you should stick to manual cleaning.
Step 8. Clean the tension discs
Some sewing machines let you remove the top cover from their left side. This will permit you to work your way to the tension discs but also to the take-up lever. However, this is not a feature met in many models.
So, if your device is a regular one, you should take a piece of material and push it up and down inside the channels of the take-up lever and the one of the tension discs.
As a piece of advice, before doing so, set the tension discs to zero because it will make the cleaning process better and you will get the best results.
To understand all the steps I’ve talked about so far, check out the following video and show a short tutorial presented by Brother:
Step 9. Apply oil
This is an optional step because you need to check if your sewing machine needs oiling or not. When you are 100% sure that you need to apply oil just follow these simple indications.
You have to put a single drop in the center of the bobbin and not on all the moving parts. However, your sewing machine can be a little different, so don’t do this step without checking the instruction manual. You can damage things if applying oil on parts that don’t require it.
Most textbooks advise on the kind of oil your machine supports. If not, be sure to buy extra thin and transparent oil made especially for this purpose.
After administering the dab of oil you should rub off any excess before putting the bobbin case back.
I recommend that after doing this step, and this is the last cleaning part you need to do, sew a small piece of material that you can throw away. Usually, some oil can pour when doing the first stitches and it will stain. You don’t want to ruin a good project.
Tips and Tricks for Longevive Sewing Machine
You now know all there is to know about the cleaning process, but before wrapping this subject up, I want to give you some personal tips and tricks that will help you keep your sewing machine alive for a long time without too much fixing done.
Use a Cover to Defend Your Sewing Machine from Dirt and Other Pollutants
Most models come with covers as accessories, but if yours didn’t include one, spend some more money and purchase one.
By encasing your sewing machine you will keep the dirt and the dust away. Don’t cover it only when traveling. Do it after every use. I know that is scary, but dust and pollutant live among us in the house no matter what we do. Especially, if you live in the city.
Putting the cover on and taking it off will only take a few seconds, but it will save you a lot of time when cleaning your sewing machine.
Where to Store Your Sewing Machine
If you are going on a holiday or taking a break from sewing for a while, you need to find a good place for your sewing machine to store. Be aware that they don’t like moisture and dust regardless if they are mechanical or computerized. Therefore, find a proper place for the sewing machine, such as a closet or a cabinet.
Conclusion
As you can see, cleaning your sewing machine is not complicated. Put your favorite music on and treat your device gently.
I hope that you enjoyed reading this article and if so, you can share it with your tailor friends. Also, if you have any questions or want to add something that I’ve missed, don’t hesitate to leave a comment below.

